比肩Rust?万字Ziglang项目实战 Zig 是一种命令式、通用、静态类型、编译型系统编程语言和工具链,用于维护健壮、优化和可重用的软件。
健壮:即使在内存不足等极端情况下,行为也是正确的。
优化:以最佳方式编写程序,使其能够表现良好。
可重用:相同的代码在具有不同约束条件的许多环境中都可以使用。
可维护:精确地向编译器和其他程序员传达意图。该语言对于阅读代码的开销很小,并且对于需求和环境的变化具有韧性。
它支持编译时泛型、反射和评估、交叉编译和手动内存管理。Zig 的一个主要目标是改进 C 语言,同时也受到 Rust 等其他语言的启发。
学习 Zig 的资源有很多,主要包括:
学习一门语言最快捷的方式,当然是用它,上手最快的方式,当属项目实战,在运用中去学习,在学习中输出。通过本文我们将学习到:
切片的使用
defer防止内存泄漏
项目开发与维护
从0到1开发HTTP服务等
0x1: 从切片开始 以下是用于演示的代码片段:
1
2
3
4
5
6
7
8
9
10
11
12
13
14
15
16
17
18
19
20
21
22
23
24
25
// Zig 版本:0.10.1 // 导入标准库 const std = @import("std"); /// 返回一个切片 fn zigBits() []u8 { // 创建一个数组字面量 var message = [_]u8{ 'z', 'i', 'g', 'b', 'i', 't', 's' }; // 将数组作为字符串打印出来 std.log.debug("{s}", .{message}); // 我们需要使用地址运算符(&)将其强制转换为切片类型 '[]u8'。 return &message; } /// 程序的入口 pub fn main() void { // 常量赋值 const message = zigBits(); // 打印message std.log.debug("{s}", .{message}); }
Q:上述实现是从一个函数中返回一个切片,并打印其值吗?
A:是的!我们期望看到 zigbits 两次。一次来自函数内部,一次来自主函数。
让我们运行它:
1
2
3
$ zig build run plaintextCopy codedebug: zigbits debug: �,�$
这跟我们预期的结果不太一致。retry?
1
2
3
4
$ zig build run plaintextCopy codedebug: zigbits debug: �;�
Q:这里打印的是 u8 数组而不是切片?结果显示不是同一个数组?
1
2
3
4
5
6
- std.log.debug("{s}", .{message}); + std.log.debug("{d}", .{message}); $ zig build run debug: { 122, 105, 103, 98, 105, 116, 115 } debug: { 80, 129, 179, 51, 255, 127, 0 }
分析说明 让我们看看这一行:
在这里,我们实际上返回的是一个栈上分配的数组切片。
1 try std.testing.expect(@TypeOf(&message) == *[7]u8);
由于数组是在栈上分配的,当我们从函数中返回时,它可能会被破坏,即当我们从函数返回时释放时。这在文档的“Lifetime and Ownership”部分有解释:
Zig 使用者有责任确保指针在指向的内存不再可用时即不会被访问。注意,切片是指针的一种形式,因为它引用其他内存。
这就是当我们尝试在从函数返回后打印数组内容时为什么会得到随机的无意义字符串的原因。
此外,在 ziglang/zig官方仓库中有一个相关问题说明:https://github.com/ziglang/zig/issues/5725
解决方案 我们可以通过几种方式来解决这个问题:
将切片作为参数传递给函数
将数组设置为全局变量
最常见的做法:分配切片(返回切片的分配副本)
让我们看看每种解决方案是如何运作的。
将切片作为参数传递
不带 len 的话 main 函数不知道写入的字节数,因此最终的日志会打印整个缓冲区,而不单单是实际的消息部分。
1
2
3
4
5
6
7
8
9
10
11
12
13
14
15
16
17
18
19
20
21
22
23
// Zig 版本:0.10.1 const std = @import("std"); fn zigBits(slice: []u8) usize { var message = [_]u8{ 'z', 'i', 'g', 'b', 'i', 't', 's' }; std.log.debug("{s}", .{message}); std.mem.copy(u8, slice, &message); } pub fn main() void { var message: [9]u8 = undefined; const len = zigBits(&message); std.log.debug("{s}", .{message[0..len]}); std.log.debug("{s}", .{message}); }
正如所看到的,将函数的返回值更新为 void,并使其接受一个切片参数。使用 std.mem.cpy 方法在函数中更新切片,而不是使用 return。
这种方法类似于在 Rust 中将可变引用(&mut)传递给函数
运行结果如下:
1
2
3
4
$ zig build run plaintextCopy codedebug: zigbits debug: zigbits debug: zigbits�,�$
使用全局数组
1
2
3
4
5
6
7
8
9
10
11
12
13
14
15
16
17
18
// Zig 版本:0.10.1 const std = @import("std"); var message = [_]u8{ 'z', 'i', 'g', 'b', 'i', 't', 's' }; fn zigBits() []u8 { std.log.debug("{s}", .{message}); return &message; } pub fn main() void { const msg = zigBits(); std.log.debug("{s}", .{msg}); }
我们将数组字面量声明为全局变量,其将会被延迟解析,并且可以被内部作用域访问。
1
2
3
$ zig build run debug: zigbits debug: zigbits
分配切片
1
2
3
4
5
6
7
8
9
10
11
12
13
14
15
16
17
18
19
20
// Zig 版本:0.10.1 const std = @import("std"); fn zigBits() ![]u8 { var message = [_]u8{ 'z', 'i', 'g', 'b', 'i', 't', 's' }; std.log.debug("{s}", .{message}); var message_copy = try std.heap.page_allocator.dupe(u8, &message); return message_copy; } pub fn main() !void { const message = try zigBits(); std.log.debug("{s}", .{message}); }
我们在这一行上对切片进行了堆上的复制:
1 var message_copy = try std.heap.page_allocator.dupe(u8, &message);
这使得切片可以在函数外部使用,因为现在它在堆上分配了:
1
2
3
$ zig build run debug: zigbits debug: zigbits
更常见和符合惯例的处理此类情况的方式是将 std.mem.Allocator 传递给分配内存的函数。这样一来,我们可以允许调用者决定使用哪种分配器。
1
2
3
4
5
6
7
8
9
10
11
12
13
14
15
16
17
18
19
20
21
// Zig 版本:0.10.1 const std = @import("std"); fn zigBits(allocator: std.mem.Allocator) ![]u8 { var message = [_]u8{ 'z', 'i', 'g', 'b', 'i', 't', 's' }; std.log.debug("{s}", .{message}); var message_copy = try allocator.dupe(u8, &message); return message_copy; } pub fn main() !void { // https://ziglang.org/documentation/master/#Choosing-an-Allocator const allocator = std.heap.page_allocator; const message = try zigBits(allocator); std.log.debug("{s}", .{message}); }
改进 让我们改进我们的程序,以返回一个具有指定长度的切片,而非栈上分配的数组。
1
2
3
4
5
6
7
8
9
10
11
12
13
14
15
16
17
18
19
20
21
22
23
24
25
// Zig 版本:0.10.1 const std = @import("std"); fn zigBits(len: usize) ![]u8 { var message = [_]u8{ 'z', 'i', 'g', 'b', 'i', 't', 's' }; std.log.debug("{s}", .{message}); // 切片是指针和长度。数组和切片的区别在于,数组的长度是类型的一部分,并且在编译时已知,而切片的长度在运行时已知。 try std.testing.expect(@TypeOf(message[0..len]) == []u8); // 我们使用 `len` 参数来使用运行时已知的值进行切片。 // 如果 `len` 声明为 `comptime len`,那么此值将为 '*[N]u8'。 return message[0..len]; } pub fn main() !void { const message = try zigBits(7); std.log.debug("{s}", .{message}); }
这与第一个示例中的悬挂指针问题相同。在 Zig 中,&message 和 message[0..] 将返回相同的切片。
我们可以使用 https://godbolt.org/z/cPWjajYxb 检查此行为,该行为显示了在使用 ![]u8 时,“zigbits” 放置在堆栈中的 40 个字节,而在使用 []u8 时,“zigbits” 放置在堆栈中的 16 个字节。
0x2: 使用defer防止内存泄漏 在第一章节中,我们讨论了从函数返回切片以及 Zig 如何管理内存这个话题。我们了解到 Zig 数组是在堆栈上分配的,当它们被访问时,如果指向它们的内存不再可用,它们可能会被破坏。
1
2
3
4
5
6
7
8
9
10
11
12
13
14
15
16
17
18
19
20
// Zig 版本:0.10.1 const std = @import("std"); fn zigBits() ![]u8 { var message = [_]u8{ 'z', 'i', 'g', 'b', 'i', 't', 's' }; std.log.debug("{s}", .{message}); var message_copy = try std.heap.page_allocator.dupe(u8, &message); return message_copy; } pub fn main() !void { const message = try zigBits(); std.log.debug("{s}", .{message}); }
在这里,你可以看到我们使用了一个硬编码的 std.heap.page_allocator 来复制内存。然而,在 Zig 的分配器使用约定中,我们一般会声明一个分配器,然后将分配器作为参数传递给函数,如下所示:
1
2
3
4
5
6
7
8
9
10
11
12
13
14
15
16
17
18
19
20
21
22
// Zig 版本:0.10.1 const std = @import("std"); fn zigBits(allocator: std.mem.Allocator) ![]u8 { var message = [_]u8{ 'z', 'i', 'g', 'b', 'i', 't', 's' }; std.log.debug("{s}", .{message}); var message_copy = try allocator.dupe(u8, &message); return message_copy; } pub fn main() !void { const allocator = std.heap.page_allocator; const message = try zigBits(allocator); std.log.debug("{s}", .{message}); }
这样,调用者可以根据定义为通用 std.mem.Allocator 的类型来决定分配器的类型。
处理文件路径 下述为我们的示例程序,它的目标是连接文件系统路径并打印结果:
1
2
3
4
5
6
7
8
9
10
11
12
13
14
15
16
17
18
19
20
21
22
// Zig 版本:0.10.1 const std = @import("std"); /// 连接给定的路径,并返回 '/home' 目录下的路径。 fn concatPath(allocator: std.mem.Allocator, p1: []const u8, p2: []const u8) ![]const u8 { // 定义路径分隔符(对于 POSIX 系统来说是 '/')。 const separator = std.fs.path.sep_str; // 连接路径并返回结果。 const path = try std.fs.path.join(allocator, &.{ separator, "home", p1, p2 }); return path; } pub fn main() !void { const allocator = std.heap.page_allocator; const path = try concatPath(allocator, "zig", "bits"); std.log.debug("{s}", .{path}); }
你可能已经猜到,在这个程序中我们会围绕 concatPath 函数进行说明。它接受一个通用的分配器类型(allocator),并连接给定的 p1 和 p2 路径字符串。在最终路径前面添加了 “/home”。
1
2
3
$ zig build run debug: /home/zig/bits
你可以看到一切都正常,我们成功地打印出了最终路径,但你有没有发现内存泄漏?
分析说明 首先,什么是内存泄漏,为什么会发生呢?
在计算机编程中,内存泄漏就像那些永不满足的黑洞一样——程序不断地消耗着越来越多的内存,没有任何限制,程序也不会释放那些它们不再需要的内存。
在我们的示例中,我们正在使用分配器将我们的字符串连接起来。但问题在于我们从未释放通过分配器分配的内存。所以我们的程序不断地分配内存。
解决方案 幸运的是,Zig有方法简化我们的工作。与Golang等现代高级语言一样,我们可以使用 defer 语句来确保在函数返回时释放内存。什么是 defer 语句呢?它是一种执行在函数返回之前的语句,类似hook,让我们来看看如何使用它:
1
2
3
4
5
6
7
8
9
10
11
12
13
14
15
16
17
18
19
20
21
// Zig 版本:0.10.1 const std = @import("std"); fn concatPath(allocator: std.mem.Allocator, p1: []const u8, p2: []const u8) ![]const u8 { const separator = std.fs.path.sep_str; defer allocator.free(path); const path = try std.fs.path.join(allocator, &.{ separator, "home", p1, p2 }); return path; } pub fn main() !void { const allocator = std.heap.page_allocator; const path = try concatPath(allocator, "zig", "bits"); std.log.debug("{s}", .{path}); }
通过上述示例,我们看看 defer 语句的具体用法。在我们的函数中,我们在调用 std.fs.path.join 之前添加了 defer 语句。这意味着当函数返回之前,我们将调用 allocator.free(path),从而释放我们分配的内存。这样,就不会再有内存泄漏了!
0x3: 从0到1构建HTTP服务 现在让我们尝试使用 Zig >=0.11 的 std.http 模块,并从头开始创建一个 HTTP 服务器/客户端(以及一些基准测试)。
在学习一门新的编程语言时,一般都是从编写 HTTP 服务器/客户端开始。 Zig 标准库将从 0.11.0 (现在已经到0.13版本了)开始具有一些令人兴奋的 HTTP 功能。作为第一步,让我们尝试使用新功能进行一些实验,并尝试设计出一些功能性的东西。此外,我们如果对性能/速度方面的事情感兴趣,可以创建一些基准测试,以查看与其他编程语言(如 Rust)的比较,该章节包含以下内容
查看 std.http
构建一个 HTTP 客户端
构建一个 HTTP 服务器
基准测试
std.http简介
Zig 最近几个月终于实现了内置的 HTTP 服务器/客户端支持,下述为具体说明:
总结一下这个新添加的 std.http 模块的功能:
仅在 Zig 0.11.0-dev.2675-0eebc2588 及以上版本中可用。
支持 HTTP/1.1(请参阅 A barely HTTP/2 server in Zig )
支持诸如连接池、压缩内容、代理和 TLS 等功能。
而我认为最令人兴奋的部分是:
使用最新(0.11.0)的 Zig,无需找到额外的库,我们就可以通过Get获取网站的内容或发送 POST 请求,不费吹灰之力…
std.http 具有以下 API:
Client:HTTP 客户端实现。
Server:HTTP 服务器实现。
Connection:连接类型(keep_alive、close)
ContentEncoding:压缩选项(compress、deflate、gzip 和 zstd)
Field:名称和值的通用类型
Headers:HTTP 标头
Method:HTTP 方法,如 GET 和 POST
Status:HTTP 状态码(not_found = 404、teapot = 418 等)
TransferEncoding:用于传输正文的编码形式(chunked)
Version:当前为 HTTP/1.0 和 HTTP/1.1
正如您已经注意到的那样,这是一个非常简单直接的 HTTP 实现,与当前稳定版本的 Zig(0.10.1)相比,std.http 并不那么简陋,而是具有一些很酷的添加功能,比如内容/传输编码和标头,进步很大!
构建一个 HTTP 客户端
在开始之前,我们需要选择一个分配器来使用。这是 Zig 的一个有趣之处,另外,强烈建议你阅读关于分配器的资料,这样你可以精确地知晓如何进行内存分配。
简单起见,我们使用 std.heap.GeneralPurposeAllocator,这是一个安全的分配器,可以防止双重释放(double-free)、使用已释放的内存(use-after-free),并且可以检测内存泄漏等情况。
1
2
3
4
5
const std = @import("std"); var gpa = std.heap.GeneralPurposeAllocator(.{}){}; defer std.debug.assert(gpa.deinit() == .ok); const allocator = gpa.allocator();
接下来,我们创建 Client 对象:
1
2
3
4
const http = std.http; var client = http.Client{ .allocator = allocator }; defer client.deinit();
如你所见,创建 Client 唯一需要的参数是分配器。跟Rust、Golang一样,构造时还可以在选择性地提供证书包、连接池和代理。
需要注意的是 defer 关键字。它指示在客户端超出作用域时将调用 deinit 方法,这意味着与客户端关联的所有资源将被释放。
要发送请求,我们需要以下几样东西:
一个 std.http.Method
一个 std.Uri,由一个 URL 解析而来。
一个 std.http.Headers,用于保存发送到服务器的请求头。只有当我们向其中追加内容时,它才会分配内存。
1
2
3
4
5
6
const uri = std.Uri.parse("https://whatthecommit.com") catch unreachable; var headers = std.http.Headers{ .allocator = allocator }; defer headers.deinit(); try headers.append("accept", "*/*");
然后们准备创建一个 Request 对象:
1
2
var request = try client.request(.GET, uri, headers, .{}); defer request.deinit();
要真正发送请求,我们还需要使用 start 函数,如下所示:
这种方式在很有用。例如,
1
2
3
4
5
6
var request = try client.request(.POST, uri, headers, .{}); defer request.deinit(); request.transfer_encoding = .chunked; try request.start();
在发送请求后,我们需要等待服务器发送响应:
这个 wait 调用将为我们处理以下任务:
最后,要读取来自服务器的响应,我们可以使用 Request 的 reader() 方法获取一个 std.io.Reader。剩下的就是在 Zig 中从流中读取数据:
1
2
const body = request.reader().readAllAlloc(allocator, 8192) catch unreachable; defer allocator.free(body);
以下是将所有步骤结合在一起并打印出响应的代码:
1
2
3
4
5
6
7
8
9
10
11
12
13
14
15
16
17
18
19
20
21
22
23
24
25
26
27
28
29
30
31
32
// Zig 版本:0.11.0 const std = @import("std"); const http = std.http; pub fn main() !void { var gpa = std.heap.GeneralPurposeAllocator(.{}){}; defer std.debug.assert(gpa.deinit() == .ok); const allocator = gpa.allocator(); var client = http.Client{ .allocator = allocator }; defer client.deinit(); const uri = std.Uri.parse("https://whatthecommit.com/index.txt") catch unreachable; var headers = std.http.Headers{ .allocator = allocator }; defer headers.deinit(); try headers.append("accept", "*/*"); var request = try client.request(.GET, uri, headers, .{}); defer request.deinit(); try request.start(); try request.wait(); const body = request.reader().readAllAlloc(allocator, 8192) catch unreachable; defer allocator.free(body); std.log.info("{s}", .{body}); }
最终运行结果:
1
2
$ zig build run error: TlsInitializationFailed
结果运行出错,新语言就是这么难查问题,我们在Zig官方issue中发现了一个问题:
https://github.com/ziglang/zig/issues/14172
当前标准库中的 TLS 实现仅支持 TLS 1.3,不幸的是,我们测试的网站 whatthecommit.com 使用的是 TLS 1.2。
我们可以通过以下命令来验证是否支持 TLS 1.3:
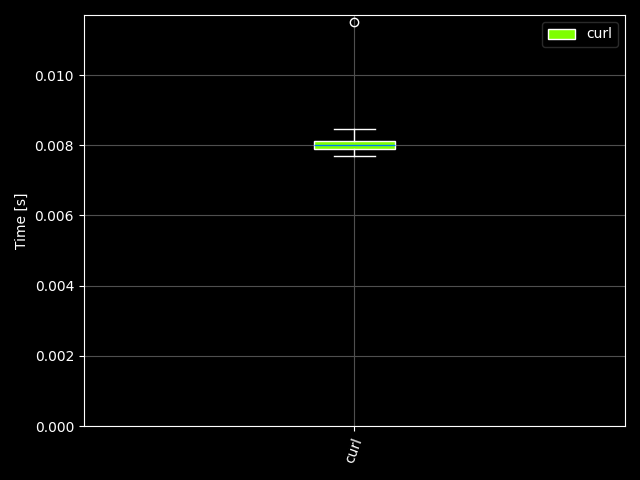
1 $ curl -v --tlsv1.3 https://whatthecommit.com/index.txt
结果显示网站不支持 TLS 1.3。
那么我们换个目标网址,更新程序中的 URL 并再次运行它:
1
2
3
$ sed -i "s|https://.*\"|https://godsays.xyz\"|g" src/main.zig $ zig build run
结果成功了!那 POST 请求呢?我们可以这样写入数据:
1
2
3
4
5
6
7
8
9
10
var request = try client.request(.POST, uri, headers, .{}); defer request.deinit(); request.transfer_encoding = .chunked; try request.start(); try request.writer().writeAll("Zig Bits!\n"); try request.finish(); try request.wait();
构建一个 HTTP 服务器
现在简单的部分已经完成了,让我们进入正题:如何实现一个HTTP服务器。
在下面的实现中,我们从标准库中的测试中获得了一些灵感,并提出了一个简化版本,去掉了多线程和断言等。
为了保持简单,直接添加一个名为 /get 的路径就足够了。
所以我们想要实现的目标很简单:
1
2
3
$ curl 127.0.0.1:8000/get Zig Bits!
你是否知道Python只需要一行就能创建 HTTP 服务器吗? python -m http.server 8000。
让我们快速定义一下服务器配置的常量:
1
2
3
4
5
6
const std = @import("std"); const http = std.http; const log = std.log.scoped(.server); const server_addr = "127.0.0.1"; const server_port = 8000;
这里需要注意的是,我们为 log 模块指定了一个作用域,这样日志消息会显示为 info(server)、debug(server) 等等。
接下来,我们需要选择一个分配器(allocator),再次使用 std.heap.GeneralPurposeAllocator,以保持与 HTTP 客户端示例的一致性。
1
2
3
var gpa = std.heap.GeneralPurposeAllocator(.{}){}; defer std.debug.assert(gpa.deinit() == .ok); const allocator = gpa.allocator();
现在构建 Server 对象并指示在其作用域结束时释放资源。
1
2
var server = http.Server.init(allocator, .{ .reuse_address = true }); defer server.deinit();
将服务器绑定到我们之前定义的地址上:
1
2
3
4
log.info("Server is running at {s}:{d}", .{ server_addr, server_port }); const address = std.net.Address.parseIp(server_addr, server_port) catch unreachable; try server.listen(address);
和每个 HTTP 服务器的实现一样,我们需要一个机制来阻塞当前线程,等待下一个请求并处理它。为此,在 Zig 中我们可以这样做:
Server 的 accept 方法返回一个 Response。Response 包含有用的信息,如请求方法和头信息。Response 还提供了用于处理请求的辅助方法。例如,wait 方法可以用来等待客户端完成请求头的发送。
当我们把这些拼凑在一起时,服务器运行函数看起来像这样:
1
2
3
4
5
6
7
8
9
10
11
12
13
14
15
16
17
18
19
20
21
22
// 运行服务器并处理传入的请求 fn runServer(server: *http.Server, allocator: std.mem.Allocator) !void { outer: while (true) { // 接受传入的连接 var response = try server.accept(.{ .allocator = allocator, }); defer response.deinit(); while (response.reset() != .closing) { // 处理请求处理期间的错误 response.wait() catch |err| switch (err) { error.HttpHeadersInvalid => continue :outer, error.EndOfStream => continue, else => return err, }; // 处理请求 try handleRequest(&response, allocator); } } }
在这里,我们首先创建一个无限循环来接受传入的连接。然后还有另一个循环用于通过 wait 方法从流中读取响应。同时,在Header无效时跳过读取循环中的响应。
正如你所见,处理请求的步骤是在服务器循环的最后通过 handleRequest 函数完成的。
1
2
3
4
5
6
7
8
9
10
11
12
13
14
15
16
17
18
19
20
21
22
23
24
25
26
27
28
29
30
31
32
33
34
35
36
37
38
// 处理单个请求 fn handleRequest(response: *http.Server.Response, allocator: std.mem.Allocator) !void { log.info("{s} {s} {s}", .{ @tagName(response.request.method), @tagName(response.request.version), response.request.target }); // 读取请求体 const body = try response.reader().readAllAlloc(allocator, 8192); defer allocator.free(body); // 如果请求头中存在 "connection",将其设置为 "keep-alive" if (response.request.headers.contains("connection")) { try response.headers.append("connection", "keep-alive"); } // 检查请求目标是否以 "/get" 开头 if (std.mem.startsWith(u8, response.request.target, "/get")) { // 检查请求目标是否包含 "?chunked" if (std.mem.indexOf(u8, response.request.target, "?chunked") != null) { response.transfer_encoding = .chunked; } else { response.transfer_encoding = .{ .content_length = 10 }; } // 设置 "content-type" 头为 "text/plain" try response.headers.append("content-type", "text/plain"); // 写入响应体 try response.do(); if (response.request.method != .HEAD) { try response.writeAll("Zig "); try response.writeAll("Bits!\n"); try response.finish(); } } else { // 设置响应状态为 404(未找到) response.status = .not_found; try response.do(); } }
我们再来逐步分析一遍:
首先,记录传入请求的详细信息。
读取请求体并合理分配内存(最大8KB)。
如有必要,设置 Connection 头。
如果请求目标以 /get 开头,则将 "Zig Bits!" 写入响应体。
如果目标包含 ?chunked,则启用分块编码,否则使用固定内容长度。
如果请求未匹配到配置的路由,则返回404。
需要注意的一点是 finish() 和 do() 方法的区别。do() 方法只是发送响应头,而 finish() 会发送分块消息的最后一个块,或者验证我们发送了约定数量的字节。因此,如果我们在发送数据时,总是应该调用 finish() 来完成响应。
现在请求已被处理,我们也有了服务器函数,下面看看如何运行服务器并记录错误:
1
2
3
4
5
6
7
8
9
// 运行服务器 runServer(&server, allocator) catch |err| { // 处理服务器错误 log.err("server error: {}\n", .{err}); if (@errorReturnTrace()) |trace| { std.debug.dumpStackTrace(trace.*); } std.os.exit(1); };
最终的 HTTP 服务器代码如下:
1
2
3
4
5
6
7
8
9
10
11
12
13
14
15
16
17
18
19
20
21
22
23
24
25
26
27
28
29
30
31
32
33
34
35
36
37
38
39
40
41
42
43
44
45
46
47
48
49
50
51
52
53
54
55
56
57
58
59
60
61
62
63
64
65
66
67
68
69
70
71
72
73
74
75
76
77
78
79
80
81
82
83
// Zig 版本: 0.11.0 const std = @import("std"); const http = std.http; const log = std.log.scoped(.server); const server_addr = "127.0.0.1"; const server_port = 8000; fn runServer(server: *http.Server, allocator: std.mem.Allocator) !void { outer: while (true) { var response = try server.accept(.{ .allocator = allocator, }); defer response.deinit(); while (response.reset() != .closing) { response.wait() catch |err| switch (err) { error.HttpHeadersInvalid => continue :outer, error.EndOfStream => continue, else => return err, }; try handleRequest(&response, allocator); } } } fn handleRequest(response: *http.Server.Response, allocator: std.mem.Allocator) !void { log.info("{s} {s} {s}", .{ @tagName(response.request.method), @tagName(response.request.version), response.request.target }); const body = try response.reader().readAllAlloc(allocator, 8192); defer allocator.free(body); if (response.request.headers.contains("connection")) { try response.headers.append("connection", "keep-alive"); } if (std.mem.startsWith(u8, response.request.target, "/get")) { if (std.mem.indexOf(u8, response.request.target, "?chunked") != null) { response.transfer_encoding = .chunked; } else { response.transfer_encoding = .{ .content_length = 10 }; } try response.headers.append("content-type", "text/plain"); try response.do(); if (response.request.method != .HEAD) { try response.writeAll("Zig "); try response.writeAll("Bits!\n"); try response.finish(); } } else { response.status = .not_found; try response.do(); } } pub fn main() !void { var gpa = std.heap.GeneralPurposeAllocator(.{}){}; defer std.debug.assert(gpa.deinit() == .ok); const allocator = gpa.allocator(); var server = http.Server.init(allocator, .{ .reuse_address = true }); defer server.deinit(); log.info("Server is running at {s}:{d}", .{ server_addr, server_port }); const address = std.net.Address.parseIp(server_addr, server_port) catch unreachable; try server.listen(address); runServer(&server, allocator) catch |err| { log.err("server error: {}\n", .{err}); if (@errorReturnTrace()) |trace| { std.debug.dumpStackTrace(trace.*); } std.os.exit(1); }; }
让我们看看运行情况:
1
2
3
4
5
$ zig build run info(server): Server is running at 127.0.0.1:8000 info(server): GET HTTP/1.1 /get info(server): GET HTTP/1.1 /get?chunked
在另一个终端中执行:
1
2
3
4
5
$ curl 127.0.0.1:8000/get Zig Bits! $ curl 127.0.0.1:8000/get?chunked Zig Bits!
现在我们有了一个纯 Zig 编写的功能性 HTTP 服务器了。
基准测试
为了查看 Zig HTTP 客户端相对于其他编程语言实现的速度,这里使用 hyperfine 创建了一些基准测试。
这些基准测试可以在这个仓库中找到:https://github.com/orhun/zig-http-benchmarks
将 HTTP 客户端与以下几种客户端进行比较:
Rust HTTP 客户端(hyper、reqwest、ureq、attohttpc)
Go HTTP 客户端(net/http)
Python HTTP 客户端(requests)
curl
工作的方式是,运行 Zig HTTP 服务器并接受来自不同客户端的 N 个请求,然后让 hyperfine 完成它。
要运行基准测试,只需运行 ./bench.sh:
1
2
3
4
5
6
7
8
rust-ureq 运行结果: 比 rust-hyper 快 1.18 ± 0.22 倍 比 rust-reqwest 快 1.30 ± 0.27 倍 比 go-http-client 快 1.74 ± 0.38 倍 比 rust-attohttpc 快 1.92 ± 0.40 倍 比 zig-http-client 快 2.17 ± 0.63 倍 比 curl 快 4.25 ± 0.73 倍 比 python-http-client 快 10.31 ± 1.47 倍
以下是具体的测试数据:
命令
平均时间 [ms]
最小时间 [ms]
最大时间 [ms]
相对速度
curl
295.2 ± 29.3
248.6
367.9
4.25 ± 0.73
zig-http-client
150.9 ± 38.1
98.5
250.2
2.17 ± 0.63
rust-attohttpc
133.4 ± 20.6
101.1
174.7
1.92 ± 0.40
rust-hyper
82.1 ± 10.1
65.7
106.0
1.18 ± 0.22
rust-reqwest
90.0 ± 14.0
67.8
126.0
1.30 ± 0.27
rust-ureq
69.5 ± 9.6
55.3
92.9
1.00
go-http-client
120.8 ± 20.0
84.6
171.6
1.74 ± 0.38
python-http-client
716.5 ± 22.0
665.9
765.7
10.31 ± 1.47
通过比较这两个服务器的性能指标,我们可以得出它们在处理相同请求的情况下的性能差异。通常来说,性能测试的结果可能会受到多种因素的影响,包括硬件配置、操作系统、编译优化等,因此需要在真实环境中进行测试以获得更准确的结果。
0x4: 项目实战 在核心功能实现并且 Zig 代码经过了彻底的测试之后,我们可以开始做与项目管理相关的琐事,我们将分享在 Zig 项目管理方面的经验,以便能够正常的使用github等工具维护你的开源代码。
该章节将涵盖以下主题:
添加库
运行测试
代码覆盖率
文档生成
CI/CD
添加库
对于新手来说,这是一个棘手的问题之一。目前,似乎还没有一个像 cargo add 这样简单和标准的方法来为你的 Zig 项目添加库。但是,有一些用于此目的的包管理器可供选择:
gyro:一个带有索引、构建运行器和构建依赖项的 Zig 包管理器。
zigmod:Zig 编程语言的包管理器。
aquila:一个用于 Zig 项目的包索引。
对于我们接下来的项目,选择采取了一个更简单直接的方法:Git 子模块
a. 在项目的根目录下创建 libs 目录。
b. 将库作为 Git 子模块添加:
要么运行 git submodule add libs/,要么添加 .gitmodules 文件。例如,对于 zig-clap:
1
2
3
[submodule "libs/zig-clap"] path = libs/zig-clap url = https://github.com/Hejsil/zig-clap
c. 然后你需要在 build.zig 中将该包添加到你的项目中,如下所示:
1
2
3
4
const exe = b.addExecutable("exe_name", "src/main.zig"); // ... // ... exe.addPackagePath("clap", "libs/zig-clap/clap.zig")
d. 现在可以在我们的源文件中导入库:
1 const clap = @import("clap");
当然,现在还没有标准的方法来安装 Zig 库。人们常用的一些常见方法有:
使用 git 子模块或将库复制粘贴到自己的项目中。
在 build.zig 文件中添加 exe.addPackagePath(“clap”, “path/to/clap.zig”); 以使用该库。
使用非官方的包管理器,如 zigmod 或 gyro。
关于如何使用这些包管理器安装包,请查看这些包管理器的文档。
运行测试
在编写项目的测试时,我们需要为每个文件添加测试,并在 build.zig 中指定要测试的文件。例如:
1
2
3
4
5
6
const exe_tests = b.addTest("src/main.zig"); exe_tests.setTarget(target); exe_tests.setBuildMode(mode); const test_step = b.step("test", "Run unit tests"); test_step.dependOn(&exe_tests.step);
当运行 zig build test 时,它只会运行 main.zig 中的测试。我们希望运行项目中每个文件中的测试,所以我们做了下面的操作:
1
2
3
4
5
6
7
8
9
10
11
12
13
14
15
16
17
18
19
const test_step = b.step("test", "Run tests"); // loop through the modules and add them for testing for ([_][]const u8{ "main", "wav", "file", "gen" }) |module| { const test_module = b.fmt("src/{s}.zig", .{module}); var exe_tests = b.addTest(test_module); test_step.dependOn(&exe_tests.step); } sqlCopy code$ zig build test 1/1 test.run... OK All 1 tests passed. 1/2 test.encode WAV... OK 2/2 test.stream out WAV... OK All 2 tests passed. 1/1 test.read bytes from the file... OK All 1 tests passed. 1/1 test.generate music... OK All 1 tests passed.
这个方法运行结果符合预期,但还有另一种更好的方法,在是在 Reddit 帖子中找到的方法(其实我们看ziglang公共库也可以发现)。
我们需要有一个通用的文件来“引用”测试代码,以便通过一个单独的 “addTest” 语句在你的构建文件中运行它们。例如,在 src/myLibrary.zig 中:
1
2
3
4
5
6
7
pub const A = @import("A.zig"); pub const B = @import("B.zig"); pub const SomeDataType = @import("C.zig").SomeDataType; test { @import("std").testing.refAllDecls(@This()); }
然后在 build.zig 中,只需要简单地添加它作为 b.addTest(“src/myLibrary.zig”)。
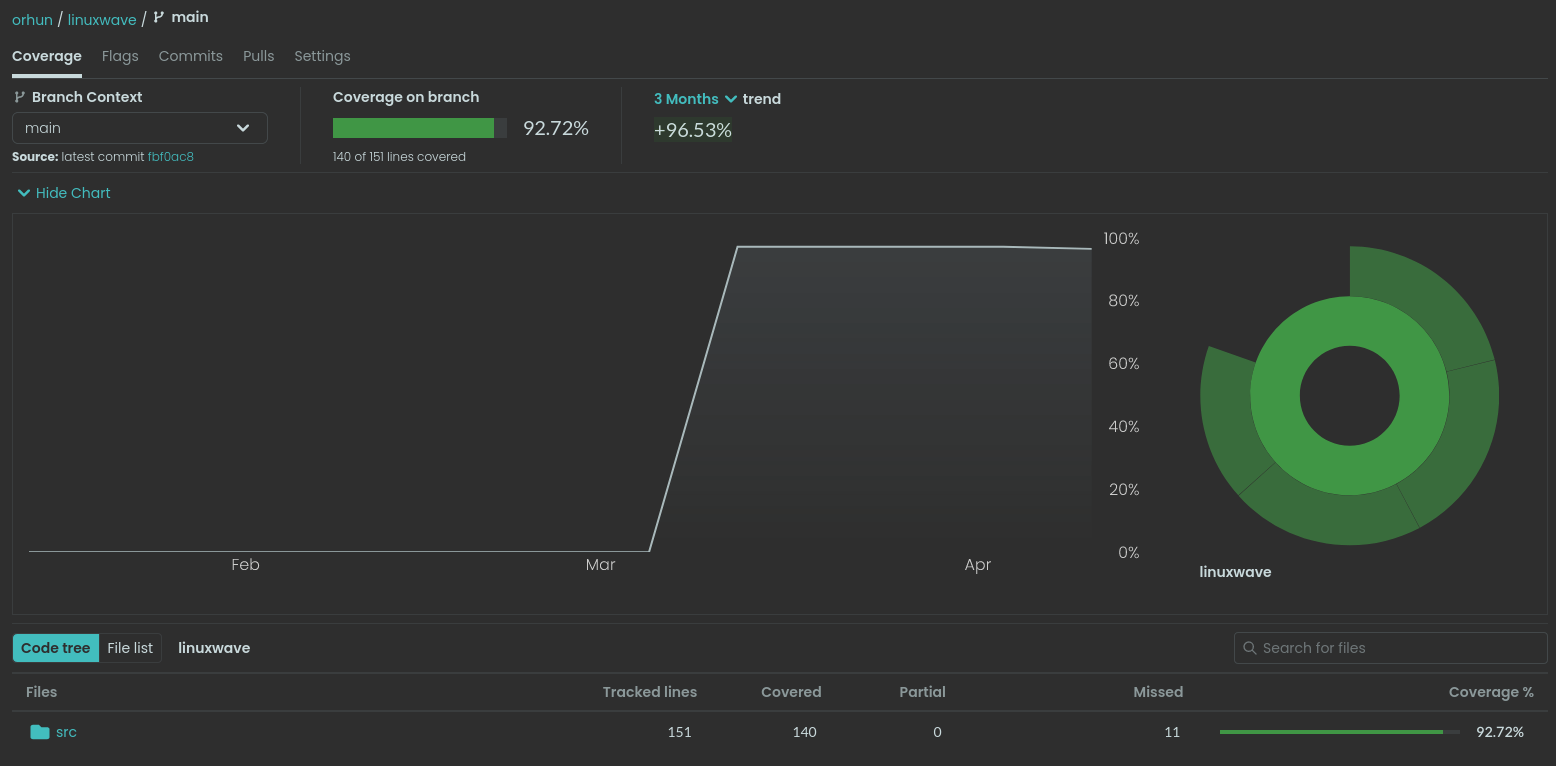
代码覆盖率
追踪项目的测试覆盖率。有助于更好地测试功能并消除潜在地错误。有时,甚至需要重构你的代码来为某个函数/模块编写测试,这样的代码将会更好。
对于 Rust 项目,通常会按照以下步骤进行测试/覆盖率检查:
编写测试
使用 cargo-nextest 运行测试
使用工具生成代码覆盖率报告
cargo-tarpaulin
cargo-llvm-cov
将其上传到 Codecov.io
对于 Zig,我们将采取以下步骤:
编写测试
使用 zig build test 运行测试
使用 kcov 生成代码覆盖率报告
将其上传到 Codecov.io
在测试通过后,第一步是生成代码覆盖率报告。我们只需要在 build.zig 中添加一个新的标志来生成覆盖率报告:
1
2
3
4
5
6
7
8
9
10
11
12
13
const coverage = b.option(bool, "test-coverage", "Generate test coverage") orelse false; const exe_tests = b.addTest("src/main.zig"); exe_tests.setTarget(target); exe_tests.setBuildMode(mode); if (coverage) { exe_tests.setExecCmd(&[_]?[]const u8{ "kcov", "kcov-output", null, }); }
现在当你运行 zig build test -Dtest-coverage 时,报告将存放在 kcov-output。
下一步是将这个报告上传到 Codecov。我们只需要编写了一个简单的 GitHub Actions 工作流程即可:
1
2
3
4
5
6
7
8
9
10
11
12
13
14
15
16
17
18
19
20
21
22
23
24
25
26
27
28
29
30
31
32
33
34
35
36
37
38
39
40
41
42
43
# contents of .github/workflows/ci.yml name: Continuous Integration on: push: branches: - main jobs: test: name: Test runs-on: ubuntu-latest steps: - name: Checkout the repository uses: actions/checkout@v3 with: # include libraries submodules: recursive - name: Install Zig uses: goto-bus-stop/setup-zig@v2 with: version: 0.10.1 - name: Install kcov run: | sudo apt-get update sudo apt-get install -y \ --no-install-recommends \ --allow-unauthenticated \ kcov - name: Test run: zig build test -Dtest-coverage - name: Upload coverage to Codecov uses: codecov/codecov-action@v3 with: name: code-coverage-report directory: kcov-output fail_ci_if_error: true verbose: true
文档生成
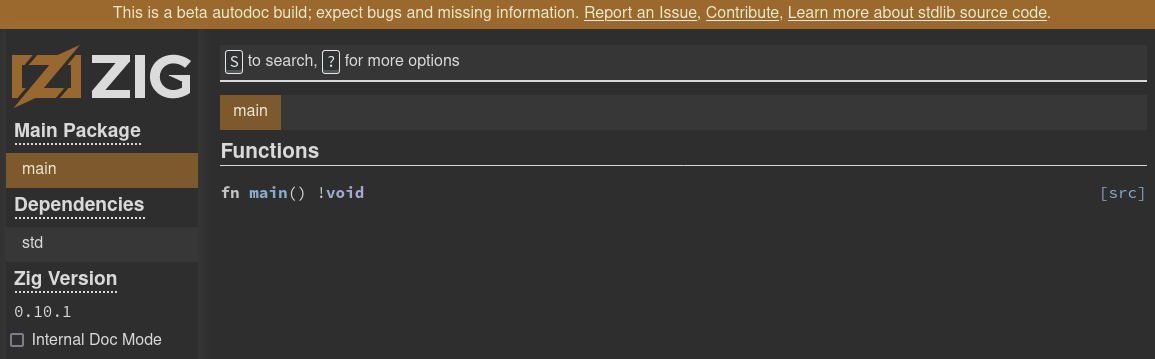
在 Ziglearn 的第 3 章中,详细解释了文档生成过程:
Zig 编译器自带自动文档生成功能。你可以通过在 zig build-{exe, lib, obj} 或 zig run 命令中添加 -femit-docs 参数来调用这个功能。生成的文档会保存在 ./docs 文件夹中,通常用于小型的静态网站。
需要注意的是这个文档生成功能目前还是实验性的,对于复杂的例子经常会失败。标准库的文档就是通过这个方式生成的。
因此,我们只需要激活 emit_docs 标志,就能自动生成文档。我们推荐在 build.zig 文件中添加一个标志,代码如下:
1
2
3
4
5
6
7
8
9
const documentation = b.option(bool, "docs", "Generate documentation") orelse false; const exe = b.addExecutable(exe_name, "src/main.zig"); exe.setTarget(target); exe.setBuildMode(mode); if (documentation) { exe.emit_docs = .emit; }
之后,你可以通过 zig build -Ddocs=true 来生成文档。生成的静态网站将保存在 docs/ 目录中,展示的样子如下:
但我们希望更进一步,把这个网站部署到 GitHub Pages 上。我们觉得在仓库中维护 docs/ 文件夹不太合适,所以把它添加到了 .gitignore 中。我们想要的是在推送提交到主分支时,能够自动生成文档并部署它。
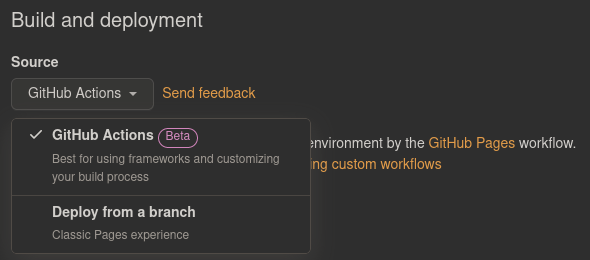
要做到这一点,首先需要为 GitHub Pages 启用 GitHub Actions 功能:
仓库 -> 设置 -> 页面 -> 构建和部署 -> 源 -> 选择 GitHub Actions 而不是以前从分支部署选项。
之后,我们只需添加以下工作流程文件,即可将文档部署到 GitHub Pages:
1
2
3
4
5
6
7
8
9
10
11
12
13
14
15
16
17
18
19
20
21
22
23
24
25
26
27
28
29
30
31
32
33
34
35
36
37
38
39
40
41
42
43
44
45
46
47
48
49
50
51
52
53
54
55
# contents of .github/workflows/pages.yml name: GitHub Pages on: # Runs on pushes targeting the default branch push: branches: [main] # Allows you to run this workflow manually from the Actions tab workflow_dispatch: # Sets permissions of the GITHUB_TOKEN to allow deployment to GitHub Pages permissions: contents: read pages: write id-token: write # Allow one concurrent deployment concurrency: group: "pages" cancel-in-progress: true jobs: deploy: name: Deploy website runs-on: ubuntu-latest environment: name: github-pages url: ${{ steps.deployment.outputs.page_url }} steps: - name: Checkout the repository uses: actions/checkout@v3 with: submodules: recursive - name: Install Zig uses: goto-bus-stop/setup-zig@v2 with: version: 0.10.1 - name: Generate documentation run: zig build -Ddocs=true - name: Setup Pages uses: actions/configure-pages@v3 - name: Upload artifact uses: actions/upload-pages-artifact@v1 with: # upload documentation path: docs - name: Deploy to GitHub Pages id: deployment uses: actions/deploy-pages@v2
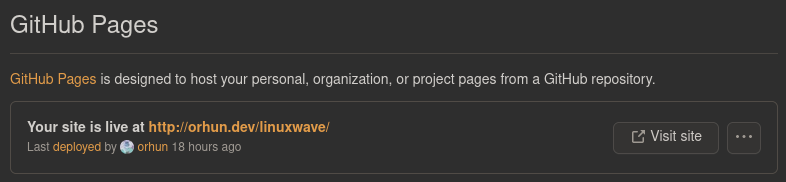
你可以在设置 > 页面 中查看部署情况:
CI/CD
最后,为我们的项目设置一个 CI/CD 工作流程。包含两个工作流程文件:
ci.yml:用于确保项目正常构建
cd.yml:用于为不同平台分发预构建的二进制文件。
持续集成
以下是一个 GitHub Actions 工作流程文件,它会在每次推送或拉取请求到主分支时自动化项目的构建、测试和格式检查过程:
1
2
3
4
5
6
7
8
9
10
11
12
13
14
15
16
17
18
19
20
21
22
23
24
25
26
27
28
29
30
31
32
33
34
35
name: Continuous Integration on: pull_request: push: branches: - main jobs: build: name: "Build with args: '${{ matrix.OPTIMIZE }}'" runs-on: ubuntu-latest strategy: fail-fast: false matrix: OPTIMIZE: ["", "-Drelease-safe", "-Drelease-fast", "-Drelease-small"] steps: - name: Checkout the repository uses: actions/checkout@v3 with: submodules: recursive - name: Install Zig uses: goto-bus-stop/setup-zig@v2 with: version: 0.10.1 - name: Build run: zig build ${{ matrix.OPTIMIZE }} - name: Test run: zig build test ${{ matrix.OPTIMIZE }} - name: Check formatting run: zig fmt --check .
这个二进制文件会针对 3 种不同的优化配置进行测试:
ReleaseFast
较快的运行时性能
禁用安全检查
编译速度慢
二进制文件较大
ReleaseSafe
中等的运行时性能
启用安全检查
编译速度慢
二进制文件较大
ReleaseSmall
中等的运行时性能
禁用安全检查
编译速度慢
二进制文件较小
持续部署
以下是一个 GitHub Actions 工作流程文件,它会在每次将新版本标签推送到存储库时自动构建一个特定目标的二进制文件,并将其发布到 GitHub:
1
2
3
4
5
6
7
8
9
10
11
12
13
14
15
16
17
18
19
20
21
22
23
24
25
26
27
28
29
30
31
32
33
34
35
36
37
38
39
40
41
42
43
44
45
46
47
48
49
50
51
52
name: Continuous Deployment on: push: tags: - "v*.*.*" jobs: publish-github: name: Publish on GitHub runs-on: ubuntu-latest strategy: fail-fast: false matrix: TARGET: [ x86_64-linux, x86_64-macos, x86_64-windows, aarch64-linux, aarch64-macos, aarch64-windows, arm-linux, riscv64-linux, i386-linux, ] steps: - name: Checkout the repository uses: actions/checkout@v3 with: submodules: recursive - name: Set the release version run: echo "RELEASE_VERSION=${GITHUB_REF:11}" >> $GITHUB_ENV - name: Install Zig uses: goto-bus-stop/setup-zig@v2 with: version: 0.10.1 - name: Build run: zig build -Drelease-safe -Dtarget=${{ matrix.TARGET }} - name: Upload the binary uses: svenstaro/upload-release-action@v2 with: file: zig-out/bin/binary-${{ env.RELEASE_VERSION }}-${{ matrix.TARGET }}* file_glob: true overwrite: true tag: ${{ github.ref }} repo_token: ${{ secrets.GITHUB_TOKEN }}
正如你在这里所看到的,通过只提供 -Dtarget 选项,轻松实现了 Zig 项目的交叉编译。
此工作流程中的 TARGET 变量由两部分组成:
CPU 架构(例如 x86_64)
操作系统(例如 linux)
总结 在本教程中,我们学习了如何使用 Zig 编程语言构建一个简单的 HTTP 服务器,并使用 std.http 模块来处理 HTTP 请求和发送 HTTP 响应。我们还通过与 Rust 编写的 HTTP 服务器进行基准测试,比较了它们在处理相同请求时的性能表现,通过项目实战,让我们的代码能够通过github实现CICD管理项目的生命周期。
参考链接